")
How to Install Low Voltage Brass Landscape Spotlights (DIY Guide)
A 12-volt landscape lighting system is something any homeowner can install in a weekend without an electrician. Brass fixtures cost more upfront than plastic, but in climates that freeze hard they’re the only choice that actually lasts. Here’s how to plan, wire, and install a system that looks professional and holds up for years.
Why 12-Volt Landscape Lighting Beats Hard-Wired Systems for DIY Installs
Most people assume outdoor lighting means trenching deep cable and hiring a licensed electrician. That’s true for 120V line voltage. A 12V low voltage system is different — it runs off a transformer plugged into any outdoor GFCI outlet, uses wire buried just 6 inches underground, and costs a fraction of a hard-wired system to install and operate.
The operating cost gap is real. A 120V halogen spotlight burns 35–50W and costs roughly $18 per year to run 8 hours a night. A 12V LED fixture at 2W runs the same schedule for under $1 annually. Across 10 fixtures, that’s $180 vs. $10 per year — enough to recover fixture costs within a few seasons.
| Feature | 12V Low Voltage | 120V Line Voltage |
|---|---|---|
| Electrician required | No | Yes (most states) |
| Shock risk during install | None | Lethal if miswired |
| Wire burial depth | 6 inches | 18–24 inches, often conduit |
| Energy use per LED fixture | ~$0.90/year at 2W | ~$18/year at 50W halogen |
| Expandability | Easy — splice onto existing wire | Requires new circuit and permit |
| DIY install time (10 fixtures) | 4–6 hours | 1–2 days plus permit inspection |
When to Choose Brass Fixtures Over Plastic or Zinc
Big-box hardware stores sell plastic and zinc-alloy landscape lights for $12–20 each. They perform fine in mild climates for 2–3 years. In USDA Zones 3–7 — where ground freezes hard through winter — a different failure mode kicks in: water infiltrates small gaps in plastic housings, freezes, expands, and splits the casing. The fixture fails, often taking the connector and a buried wire section with it.
Die-cast brass handles freeze-thaw cycling without cracking. It also develops a natural patina over time that integrates into garden settings better than the bleached-out look of weathered plastic. The upfront cost is higher. But if you’re replacing plastic fixtures every 2–3 years, you’re not actually saving money — you’re just spreading the cost out and adding labor. For anyone north of Zone 8, brass is the correct material the first time.
IP65 Waterproof Rating: What It Actually Covers
IP65 means fully dust-tight and protected against water jets from any direction — rain, sprinklers, direct hose spray, and standing water from heavy storms. IP67 adds submersion protection to 1 meter, which only matters for fixtures placed in or directly adjacent to water features. For standard tree uplighting and garden accent work, IP65 is sufficient and what you’ll find on quality landscape fixtures designed for residential use.
Planning Your Landscape Lighting Layout Before You Order Anything
The most expensive mistake in landscape lighting isn’t buying the wrong fixture. It’s buying the right fixture in the wrong quantity — overloading a transformer, running out of wire 30 feet from the last tree, or discovering you need twice as many fixtures as you ordered. The planning phase takes under an hour. Skip it and you’ll spend that hour returning half your purchase.
Step 1: Sketch Your Property and Define Zones
Draw a rough overhead sketch of your yard. No scale required — just a working reference. Mark every feature you want lit: trees, specimen shrubs, pathways, house facade details, garden walls, entry gates. Then group them into zones based on distance from your outdoor outlet. Each zone runs on a separate wire loop from the transformer’s terminal block.
Common residential zones:
- Front entry zone: path lights along the walkway plus 2–3 spotlights on trees flanking the entry
- Driveway zone: path lights spaced every 8–10 feet along the driveway edge
- Backyard perimeter: spotlights on specimen trees, flood lights on fence lines and walls
- Garden bed accent zone: low-mounted spotlights aimed upward at plant material from below
Any zone longer than 100 feet should use 12-gauge wire rather than 14-gauge. On long runs, thinner wire causes voltage drop — fixtures at the far end will be noticeably dimmer than those near the transformer.
Step 2: Size Your Transformer Correctly
Add up the wattage of every fixture you plan to install. Then buy a transformer rated for 25–30% more than that total. Running a transformer at or near its rated capacity shortens its life and causes uneven brightness across the system.
Example: 10 spotlights at 2W each = 20W. Six flood lights at 2W each = 12W. Total load: 32W. Minimum transformer: 40W. Better choice: 60–100W to allow future expansion without replacing the transformer.
Solid transformer options at different price points: the Malibu 120W transformer runs about $65 at most hardware stores, the Hampton Bay 200W is around $80 at Home Depot, and the VOLT Lighting 300W unit (~$175) covers larger properties with room to grow. All connect to standard 120V GFCI outdoor outlets.
Step 3: Measure Wire Runs Before Ordering
Walk each zone with a measuring tape. Record the distance from the transformer to the first fixture, then from fixture to fixture through the zone. Add 15% to the total length for routing around root systems, buried irrigation lines, and obstacles. Buy wire in 100-foot rolls — it’s cheaper per foot than cutting from a store spool and you’ll always have extra for corrections. Use 12/2 direct-burial rated two-conductor wire throughout.
Spotlights vs. Flood Lights: Which Fixture Belongs in Each Location
Spotlights throw a concentrated, narrow beam. Flood lights spread light wide and flat. Using only one type is the most common design mistake in residential landscape lighting. Most yards need both — spotlights for trees and vertical accents, flood lights for walls, fences, and broad horizontal surfaces where even coverage matters more than directional punch.
| Application | Fixture Type | Beam Angle | Placement |
|---|---|---|---|
| Tree uplighting | Spotlight | 15–30° | Ground level, 18–36″ from trunk, angled at 45° |
| Wall washing (fence, siding) | Flood light | 60–120° | Ground level, 12–18″ from wall surface |
| Shrub or plant accenting | Spotlight | 20–40° | Low mount, aimed up at canopy center |
| Sign illumination | Flood light | 60°+ | Below or above the sign face, angled in |
| Architectural facade detail | Spotlight | 15–20° | Close placement, precise aiming required |
| Garden wall accent | Flood light | 60–90° | Grazing angle for texture and depth |
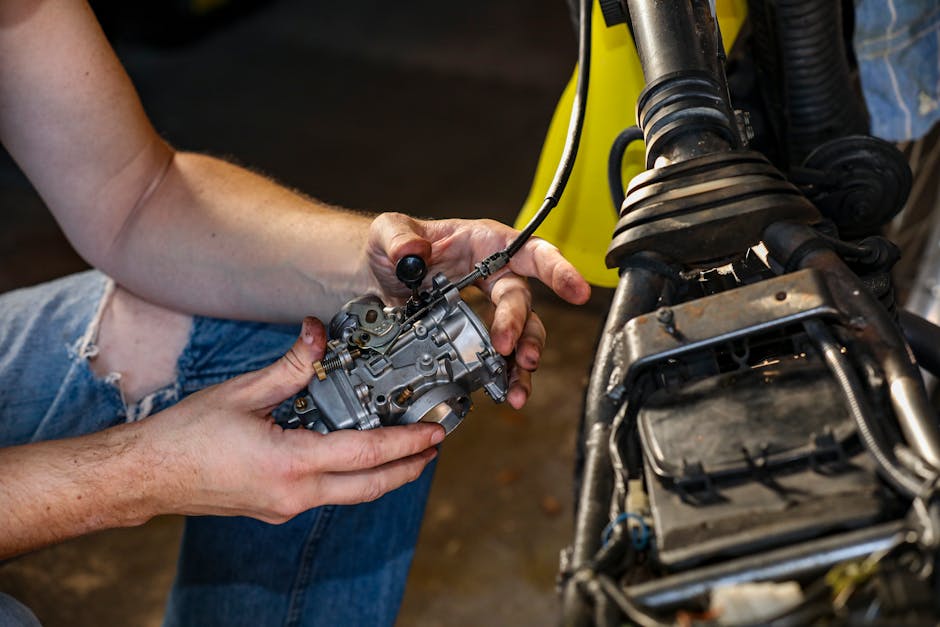
COLOER 104B Brass Spotlight: The 10-Pack That Covers Most Front Yards
For tree uplighting and close-in accent work, the COLOER 104B die-cast brass landscape spotlights cover most residential yards in a single order. At $270.99 for 10 fixtures with bulbs included, the per-unit cost is $27.10 — competitive for solid brass. Comparable brass spotlights from FX Luminaire or Kichler run $40–60 each without bulbs.
The 12V AC/DC input is a practical advantage: it works with virtually every transformer on the market, including older units. Some lower-cost fixtures only accept DC input, which creates compatibility issues with certain transformers. The IP65 waterproof rating handles sprinklers and sustained rain. Rated 4.5/5 from initial buyers — the sample size is small (11 reviews), but the brass construction is the kind of thing you can verify in hand, not just on spec sheets.
COLOER Brass Flood Lights: 6-Pack for Walls and Wide Coverage
Where the spotlight focuses, the COLOER die-cast brass flood lights spread. Running at 2W with a 9–17V input tolerance — wider than most competitors — these are forgiving of voltage drop on longer wire runs where a fixture requiring a tighter voltage range would dim noticeably at the far end. At $249.99 for a 6-pack, they’re suited to back fences, house siding, garden walls, and sign illumination.
One clear limit: don’t use these for tree uplighting. The wide beam washes out the dramatic definition that makes uplighting look intentional rather than generic. For trees, use a spotlight every time. For walls and broad surfaces, use the flood lights.
Installing 12V Landscape Spotlights: What the Instructions Skip
The included installation guide covers the basics. What it won’t tell you is which steps actually determine whether the result looks like a professional job or an afterthought. Follow this sequence.
The Installation Order That Prevents Rework
- Mount the transformer first. Attach it to an exterior wall at least 12 inches above ground level, within 6 feet of a GFCI outlet. Set the timer to run from 30 minutes after sunset to midnight or 1 AM — running landscape lights all night adds cost without adding meaningful security value.
- Lay wire along planned routes without burying yet. Run it from the transformer to each zone, leaving enough slack at each fixture position to connect without pulling the wire taut against a stake.
- Set fixtures in position without staking. Place each fixture where you think it should go, connect it to the wire, and power the system on at dusk. Walk every fixture and evaluate the angles in actual darkness — not in daylight. This step is non-optional.
- Adjust spotlight angles before staking anything. For trees, start at 45° from ground level, positioned 18–36 inches from the trunk. Palms need a steeper upward angle than spreading hardwoods. Columnar trees need tighter placement than wide canopy trees. Spend the time here — a 2-foot position change produces a completely different effect.
- Connect using screw terminals, not push-in connectors. Strip exactly 3/4 inch of insulation. Insert the conductor fully, then tighten the set screw until firm. A loose terminal corrodes within one season and causes intermittent outages that are genuinely difficult to diagnose once the wire is buried.
- Bury wire at 6-inch depth. Use a flat spade to cut a narrow trench, press the wire in, close the soil by foot. Takes about 10 minutes per zone and protects the wire from edging tools and incidental digging.
- Check brightness uniformity before calling the job done. Fixtures at equal brightness means clean voltage delivery. If far-end fixtures are noticeably dimmer, you have voltage drop — either upgrade to 12-gauge wire, shorten the run, or split the circuit into two shorter runs from the transformer’s terminal block.
Wiring to the Transformer: The Step People Rush
Strip 1 inch of insulation from both conductors on each zone’s main wire. Connect to the transformer’s terminal block — positive to positive, ground to ground. Tighten every terminal screw firmly before closing the transformer cover. A loose connection here causes intermittent outages across the entire zone and is extremely difficult to diagnose once the system is installed and the transformer cover is back on. Take the extra 30 seconds.
Mistakes That Undermine Even Well-Planned Landscape Lighting
Most failed landscape lighting installs trace back to the same four errors. Knowing them before you start is worth more than troubleshooting them after the wire is buried.
Running the Transformer at Full Rated Capacity
A 60W transformer powering 58W of fixtures runs continuously at 97% load. Voltage drop affects the far end of every wire run, and the transformer runs hot. Buy 25–30% more capacity than your calculated load. A 150W transformer running 100W of fixtures will outlast a 60W unit running 58W by years — and won’t dim your far fixtures.
Using Plastic Fixtures in Cold Climates
In USDA Zones 3–6, where temperatures regularly drop below 10°F, plastic landscape fixture housings crack within 1–3 seasons. Moisture infiltrates small gaps, freezes, expands, and splits the housing. The COLOER brass spotlight fixtures handle this without issue — brass doesn’t crack from freeze-thaw cycling. In Zone 8 and warmer, plastic is a reasonable choice. In cold climates, it’s a replacement waiting to happen.
Skipping the Night-Time Trial Run
Landscape lighting looks completely different at night than in daylight. An angle that seems correct at 2 PM looks wrong at 9 PM. A spotlight that appears aimed at the canopy in daylight might glare off the trunk after dark. Always do a full trial run at dusk before staking fixtures and burying wire. Walk the entire yard, adjust every fixture that isn’t right, and only commit to the ground once the angles look correct in actual darkness.
Mixing Fixture Wattages Without Calculating Total Load
Six 5W spotlights and four 2W path lights on one circuit draws 38W. That’s fine if your transformer handles it — a problem if it doesn’t. Most low-voltage LED landscape fixtures run 1–5W; check the spec sheet rather than estimating. Add up every fixture before powering on. Transformers that trip their internal breaker repeatedly are usually overloaded, not defective.
For a standard residential front yard with 6–8 trees and a 60-foot driveway: the COLOER 10-pack spotlight set handles the tree uplighting work, and a 6-pack of flood lights covers the facade and any garden walls. Pair them with a 150W transformer from VOLT Lighting or Hampton Bay, and you’ll have enough headroom to add path lights or expand to the backyard without replacing the transformer. That combination — brass spotlights on trees, brass flood lights on walls, oversized transformer — is the most practical starting point for most suburban properties.
Disclaimer: The information on this page is for educational purposes only and does not constitute financial advice. Rates, terms, and eligibility requirements are subject to change. Always compare multiple lenders and consult a licensed financial advisor before borrowing.